
Invisible Pelmet Kit
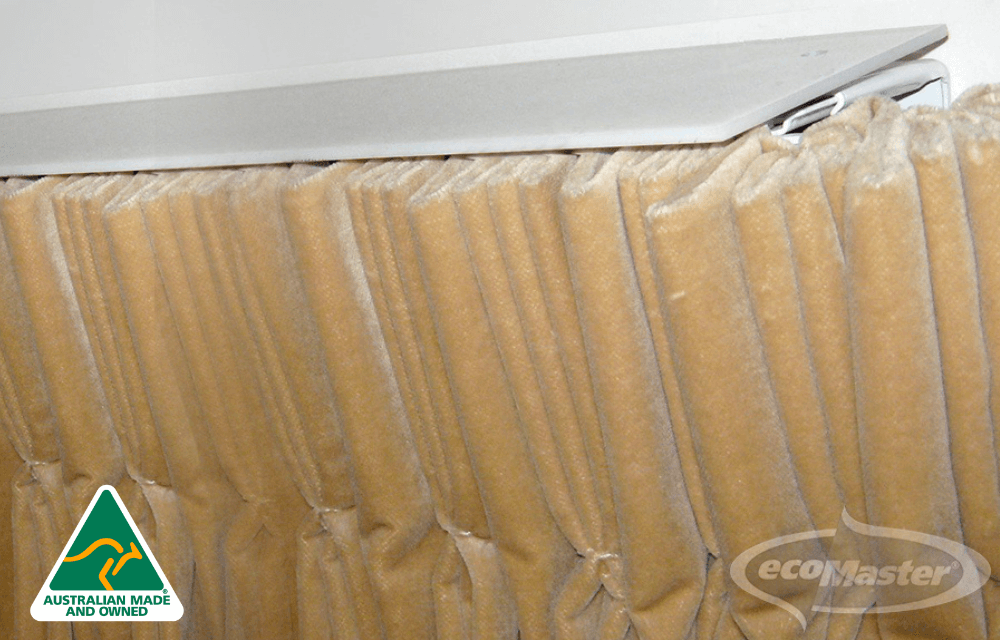
There’s a hidden gap above your curtain tracks - and it’s leaking your comfort.
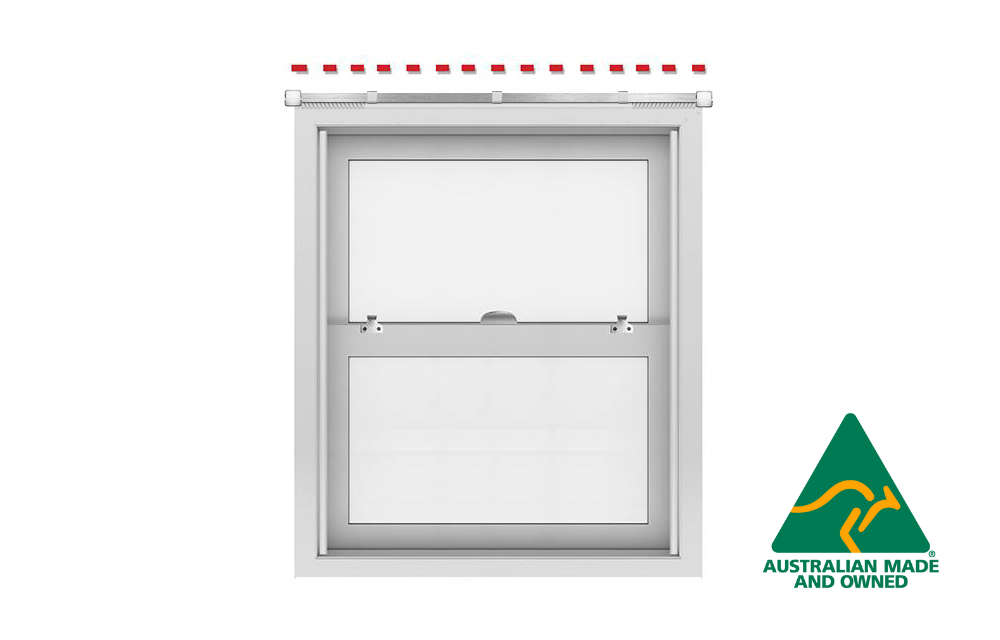
The Invisible Pelmet Kit quietly stops air from flowing behind your curtain.
No bulky fittings, just a sleek, clear panel that seals the top of your curtain tracks.
Enjoy better insulation, lower bills, and a cosier home—all year round. 💨🪟❄️🔥
Note: Invisible Pelmets are unsuitable for curtains on rods - they are suited for curtains on tracks.
🚛 Delivery direct to your doorstep
📦 Pickup available at Preston Warehouse on Tuesdays & Fridays 8AM - 3PM
🔄 Replacement guarantee
🗓️ Availability: In Stock
🏅 2 years product warranty
Pairs well with
Invisible Pelmet Kit
If you have any questions, you are always welcome to contact us. We'll get back to you as soon as possible, within 24 hours on weekdays.
-
Shipping Information
Use this text to answer questions in as much detail as possible for your customers.
-
Customer Support
Use this text to answer questions in as much detail as possible for your customers.
-
FAQ’s
Use this text to answer questions in as much detail as possible for your customers.
-
Contact Us
Use this text to answer questions in as much detail as possible for your customers.
Product details
Description
Specification
Each Invisible Pelmet Kit comprises pelmet covers for 4 metres.
There are two different components in your kit:
* The clear acrylic strips
* the "E" joiners that are used to join the pelmets together.
| Item | # Units |
Length |
Width mm |
Thick mm |
|
Clear acrylic window pelmet |
4 |
1000 |
80 | 3 |
| "E" Joiners |
3 |
How to Measure for your Invisible Pelmets:
The pelmet kit come with 4 x 1000mm acrylic strips, so there are 4 metres of pelmet per kit.
Simply measure the width of your curtain rails / tracks and divide by 4 to determine how many kits you will need to order.

Why Do You Divide by 4?
Because there are 4 metres of Invisible Pelmet in each kit.
How To Install
What you will need:
- Curtains in tracks - NOT rods
- Sharp knife with a pointy end
- Philips head screwdriver
- Pen marker
- Rigid board such as a bread board
- A ladder to reach the top of your curtain tracks
How to measure your Invisible Pelmets:
The pelmets come in a kit containing 4 x 1000mm acrylic strips, so there are four (4) metres of pelmet per kit.
Simply measure the width of your curtain rails / tracks and divide by 4 to determine how many kits you will need to order.
You need to divide the total width by 4 because there are 4 metres of Invisible Pelmets per kit.
It’s so easy to install these Invisible Pelmets yourself.
Watch our 'How to" Video
Watch how to install Invisible Pelmets with long bracket bolts in place.
If you need to seal any gaps between your window architrave and your wall, you can order Ultra Clear Gap Sealant here.
Delivery
Q: Can I collect my order?
A: Yes you can! A “Ready for Pickup” email will be sent to you when you order is ready to be collected. Please click this link for the Click and Collect details. Note: this Collection Centre is in Preston in Victoria, NOT Prestons in NSW.
Q: How much does delivery cost?
A: Freighting cost will be automatically calculated at checkout.
Q: When will my order be despatched?
A: Generally, your order will be despatched within 1 to 3 business days.
Q: How will my order be delivered?
A: Depending upon the size of your order, it will be shipped either by AusPost or a specialist courier (note this is NOT an express courier).
Q: Will my order be tracked?
A: Yes! When your order is consigned, you will receive a tracking number that will show you where your order is and its expected delivery date.
AusPost - Track your order here
Specialist Courier - Track your order here
Please note: Orders with two or more items may arrive in separate parcels with no additional shipping charge
Q: When will my order be delivered?
A: All AusPost orders are picked, packed and despatched within 2 business days. Our experience with AusPost indicates that your order will be delivered within 2 - 5 business days. Clearly this will fluctuate at peak shipping times such as Christmas and EOFY.
If your have selected the specialist courier, your order will be packed and despatched within 3 business days. Please note, this is a specialist courier - NOT an express courier. The courier will NOT get your order to your home faster, but it will deliver over-sized items that AusPost cannot deliver.
Q: What happens if my order gets lost during transit?
A: On rare occasions we have had orders go missing. ecoMaster has solid procedures in place and photograph every order that leaves our warehouse. The delivery of our orders at our local post office are videoed and we track the progress of orders. If a delivery date appears to be beyond expectation, we will raise a query with the freighter on your behalf. If your order cannot be found during transit, we will send a replacement.
Q: What happens if my order is stolen after delivery?
A: We will check with the freighter to ensure that the order was delivered to the correct address. If that is confirmed, and your order has been stolen from your home after delivery, please raise a Police Report. In practice, we have had very little of this type of incident.
FAQ
Frequently asked questions
Q: What is an Invisible Pelmet and why should I install one?
A: An invisible pelmet is a thin acrylic cover fitted to the top of curtain rails. It acts in a similar way to a box pelmet but is virtually invisible. The thermal efficiency of drapes is greatly improved by the addition of pelmets reducing heat loss in winter and heat gain in summer. Correctly installed, they will reduce your energy use.
Q: What kind of curtains are Invisible Pelmets good for?
A: Invisible Pelmets are designed to be used on curtains (drapes) that are fitted to tracks. Usually these operate via a draw cord and the top of the curtain sits slightly higher than the front of the track.
Q: Can I use Invisible Pelmet on my curtain rod or my roller blinds?
A: No, Invisible Pelmets are not suitable for curtains on a rod as the curtain hoops will not glide under the Invisible Pelmets. Likewise Roller Blinds and Holland Blinds would rub on the Invisible Pelmets as the blind is operated. Invisible Pelmets are ONLY suitable for curtains on a track.
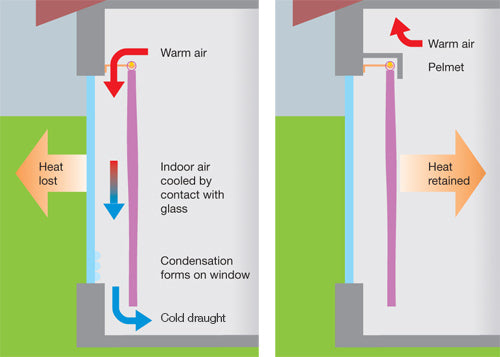
Q: Do I need to worry about overheating in summer?
A: The short answer is no, the pelmets improve the thermal efficiency of drapes by eliminating the airflow between the drapes and the window glazing. Whilst in winter, warm air enters the top, is cooled against the glass of the window, and sinks to the floor re-entering the room, drawing more warm air in the top as a cycle. In summer, the opposite happens; As air behind the drapes is warmed by the glass, it rises up past the curtain track and into the room and draws more cool air in behind the glass.
The pelmets improve the thermal efficiency of drapes by eliminating the airflow between the drapes and the window glazing, acting as a barrier to break that cycle.

Q: How hard is it to install and how long will it take me to install it?
A: Our instructional video shows you just how easy it is to install invisible pelmets at home. You don’t even need any special tools.
Q: Will I still be able to open and close my curtains?
A: The installation of this product does not affect the operation of your curtains. If you find that it does affect the opening and closing of your curtains, then it has been installed incorrectly.
Q: How do I know it has been installed properly?
A: The sections of Invisible Pelmet should sit on the top architrave of your window and rest on the track brackets and the front of the track itself. Sections should be butted up using the supplied joiners. It is most effective if your curtains wrap at the ends to butt onto the wall.
Q: How can I make my room darker with Invisible Pelmets?
A: Leave the lining paper on the Invisible Pelmet to make your room a little darker. If you want your room to be blackout, then you can remove the liner and paint the pelmet black.
Q: Do you have wider kits than 80mm?
A: No. But many curtain tracks can be reduced in the width from the wall to the edge of the curtain track.
Q: What else do I need to know about Invisible Pelmet Kits?
A: They are designed to work on curtain tracks - not rods. They do not work with roller blinds.
Q: Why does my room have a green tinge after I have installed the Invisible Pelmet Kit?
A: You have not taken off the protective cover on the pelmet. If you look carefully, there is a small sticker on the pelmet saying that it has a protective cover. Remove the protective cover and the green tinge will disappear.
Q: Can my pelmets help turn my room very dark, like black-out dark?
A: To make your room darker, do not remove the green protective cover from the pelmet, but instead paint it black. That will make your room very dark - great for shift workers!
At a glance

Length: 1000 x 80 x 3 mm Qty: 4 per pack

Australian Made


What is draught proofing, and why is it important?
Draught proofing means sealing up all the gaps (big and small) where air sneaks in or out of your home—around windows, doors, vents, chimneys, and even curtains. It’s one of the easiest and most effective ways to improve comfort, reduce energy waste, and lower your heating and cooling bills. Generally draught proofing is the first step in you making your home energy efficiency. The major component of a home’s energy costs is used on heating and cooling. Your home can’t be effectively heated or cooled if you can drive a “mac truck” under your front door.
Will this really make a difference to my energy bills?
Yes! Draught proofing reduces how often your heater or air con needs to run. Less hot air escaping in winter, less heat sneaking in during summer = lower energy use, more comfort, and more savings. In the ecoMaster test house, which was draught proofed more than 20+ years ago, we saved 50% of our $2,500 heating bill in the first year after completing it. And of course, we have continued to save that amount every year.
How do I know where the draughts are coming from?
A walk-through your home on a windy day can help you feel where air is leaking in (like under doors or around windows, chimneys and exhaust fans). You can also check unused heating vents, behind curtains, skirting boards, cornices and picture rails —these are often the hidden culprits.
If you’re not sure where to start, you’ve got three great options:
You can try to track down the draughts yourself, or get a little help with our Find and Fix My Draughts program—designed to guide DIYers in spotting every sneaky gap in their home. Prefer to leave it to the pros? We can connect you with a trusted draught proofing technician in your area for a full in-home assessment. Just get in touch and we’ll point you in the right direction.
What products do I actually need?
That depends on where the leaks are!
- Draught Dodgers for effectively sealing doors and windows.
- Chimney Draught Stoppers block open fireplaces.
- Goodbye Heating Vents seal off unused ducted heating.
- DraftStoppas stop airflow through ceiling exhaust fans.
- Invisible Pelmets help block airflow and heat loss behind curtains.
- UltraClear seals gaps and cracks where one surface meets another.
If you’re not sure, start with either work with the online program Find and Fix My Draughts, follow the Draught Proofing Information Hub one room or hire a draught proofing technician. Or contact us for a referral to a trusted draught proofing technician in your area.
Can I install draught proofing myself, or do I need a tradie?
Most draught proofing products are totally DIY-friendly—especially with the help of our video guides. They’re designed for everyday Aussies, not just seasoned professionals (althought they also buy ecoMaster products). If you’re comfortable using basic tools, you can do this. We indicate where any particular product requires an experienced hand.
If you could prefer for a draught proofing assessment and professional installation, please contact us for a referral to a trusted draught proofing technician in your area.